If you need to order proof copies of your book, the cheapest option I’ve found is via Amazon KDP. Follow my step-by-step guide to receive your printed proofs.
I’ve finally done it. My manuscript is at a stage where I’m ready to send it to beta readers. Some have requested a printed copy, rather than an ebook or PDF (I would do the same), so I’ve been investigating various printing options.
Why did I choose Amazon KDP?
It isn’t economically viable to do it at home. I found the cost of the ink alone for one copy was over £20 or $28. I did look at online printing options, but either the reviews weren’t good enough to justify the fairly high costs involved, just for proof copies (around £100 for 10 copies for my book, which is quite long in its current state), or there was a limit to the number of pages.
Then I heard about ordering proof copies via KDP. As the costs involved are far lower than other options I’d been considering (around £30 plus postage for five copies), I chose that route.
Please be aware that this blog post is about printing for proof copies, not for self-publishing to sell. Amazon KDP printed proofs have a ‘Not for Resale’ strip around the cover. I’m happy with this for my proof copies, but it may not suit you. You can easily order author copies (without the ‘Not for Resale’ strip) from KDP once you’ve published your book, but this post doesn’t cover that route.
Step-by-step guide to ordering Amazon KDP printed proofs
- Go to https://kdp.amazon.com/en_US/ and sign in with your usual Amazon login. If you don’t have an Amazon account, or if you’d rather keep your KDP activity separate from your personal Amazon account, create a separate account.
I’ve read blog posts where people who use a pen name run into difficulties when using their personal Amazon login. If you’re going to use KDP for self-publishing, not just ordering proofs, it may be worth setting up a separate KDP account.
Publishing via KDP isn’t my area of expertise, however, so I’d recommend that you do your own research.
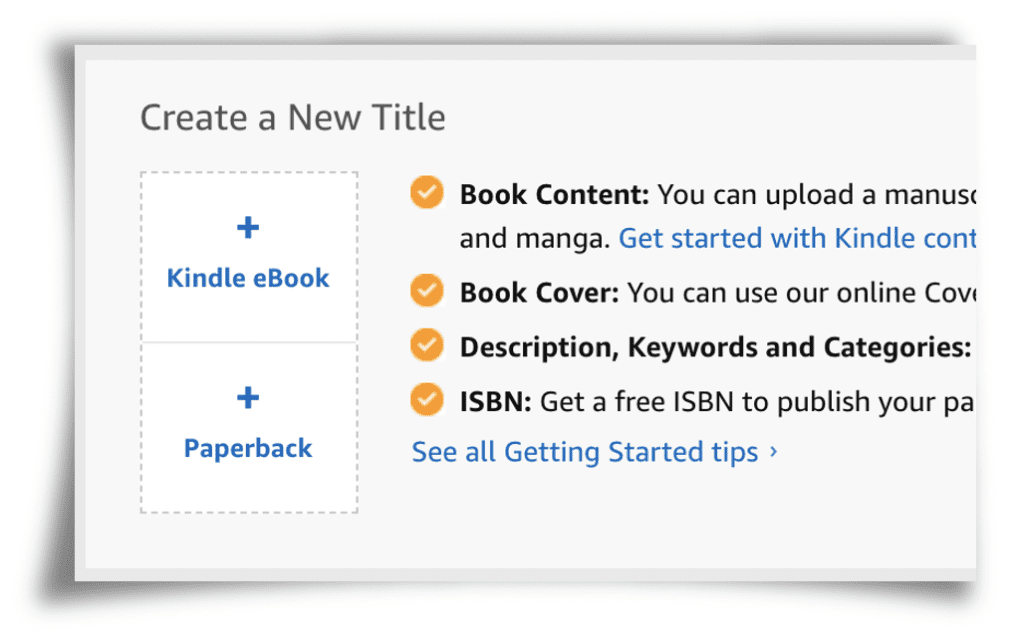
- Select + Paperback and complete the fields. They are all self-explanatory, and you can ignore the optional categories, particularly if you’re just looking to order proof copies.
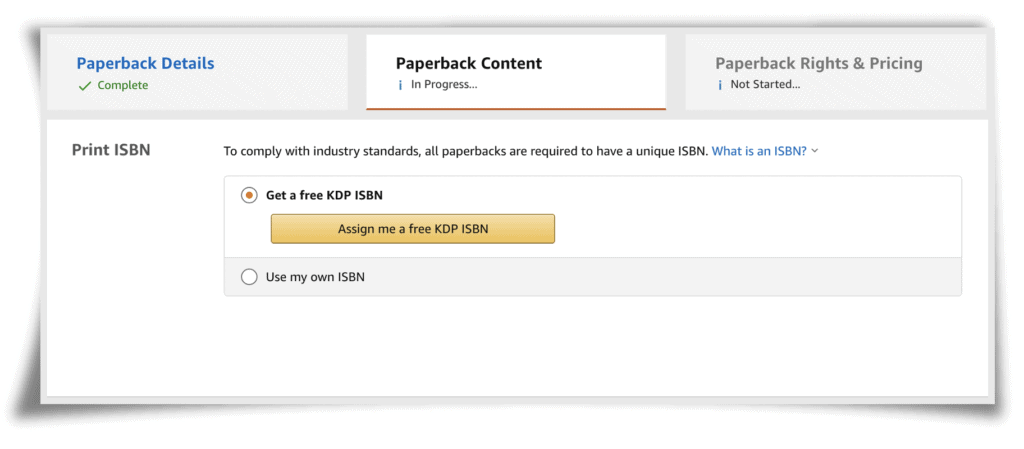
- Once your changes are saved, the Paperback Content tab will load. Assuming you don’t have your own ISBN at this stage, select the button Assign me a free KDP ISBN.
- Ignore the publication date (optional) field.
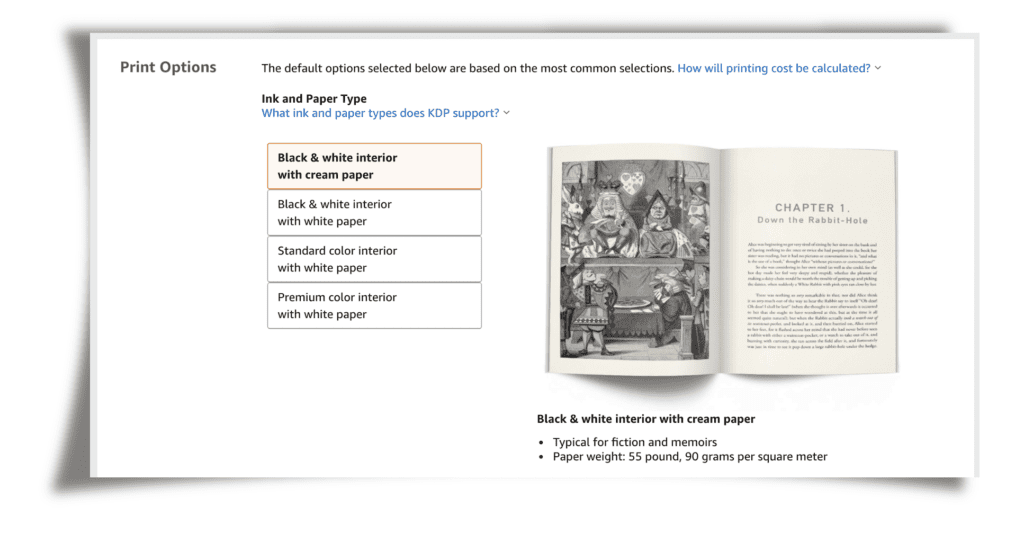
- Under Print Options, select the option that is best for your book. Generally speaking, black text on cream paper is ideal for fiction, black text on white paper is more suited to non-fiction with no colour images. If your book has colour graphics, photos etc, select your favoured option for ‘color interior’. Clicking on each button one by one will show you information about each option, with a example image.
- Trim Size refers to the size of your book. You may find this blog post on Reedsy about book sizes helpful when deciding. I chose 5.5 x 8.5 inches for my mystery novel, as it is fairly long, so 5 x 8 inches (which is my preferred size when I read a novel) would have been more pages.
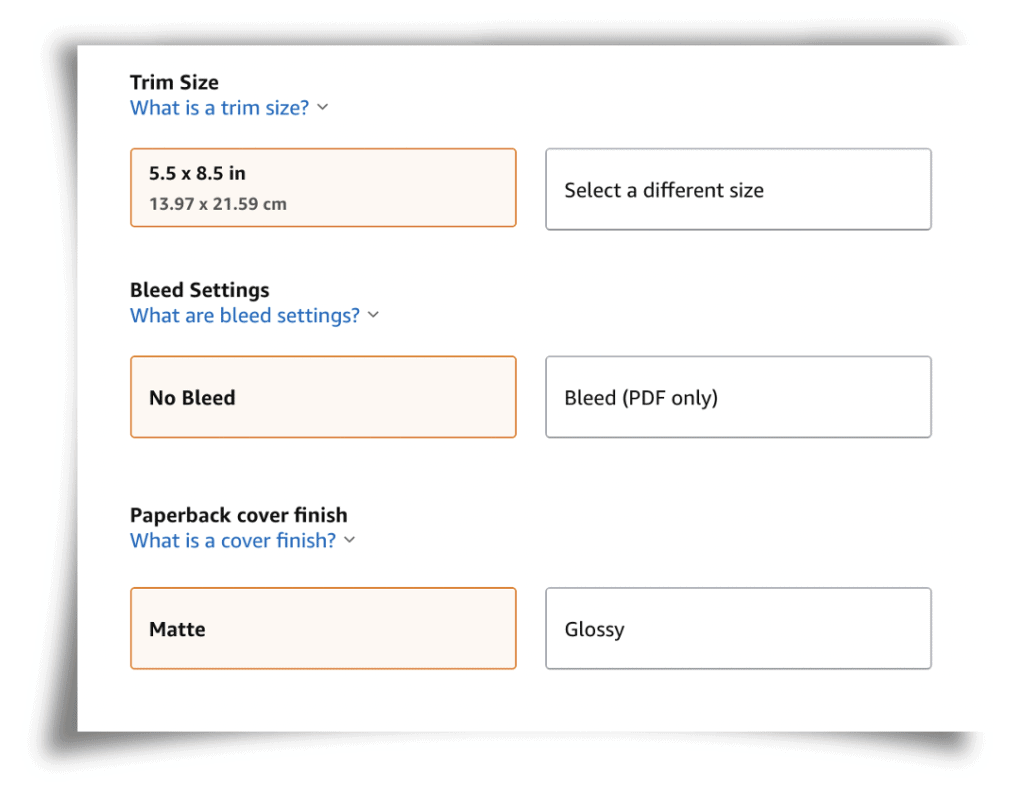
- Bleed Settings refer to whether content will be printed outside the margins. Most books will not require this, so you will probably select No Bleed. If you have large images that span two pages, for example, you may need to select Bleed (PDF only).
- Whether you choose a Matte or Glossy cover finish is entirely personal choice. I went for Matte. I’ve seen some KDP reviews saying that the gloss finish is not always very uniform. However, I don’t have first-hand experience of this so it’s entirely your choice.
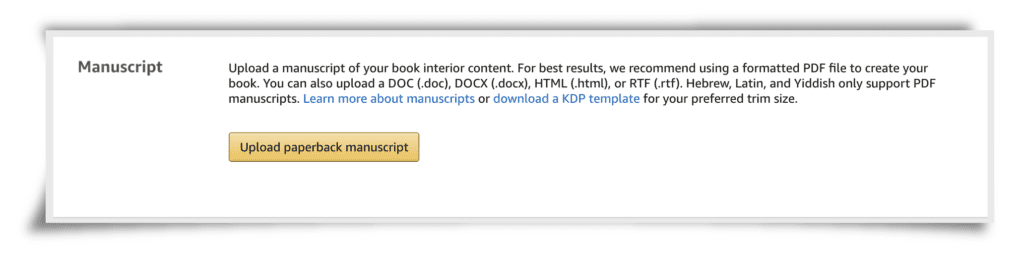
- The next box is the most exciting so far (unless you are particularly passionate about book sizes and cover finishes). We have arrived at the ‘Manuscript’ box. When you click on Upload paperback manuscript, a pop-up will appear that prompts you to browse to the location on your computer of your manuscript. This does not include the cover, purely the interior pages.
It should ideally be in PDF format, already laid out exactly as you wish it to appear in the final book. I used Scrivener to format my book, and I will write a blog post about this in the not-too-distant future. Another popular formatting choice is Vellum, but there are other options.
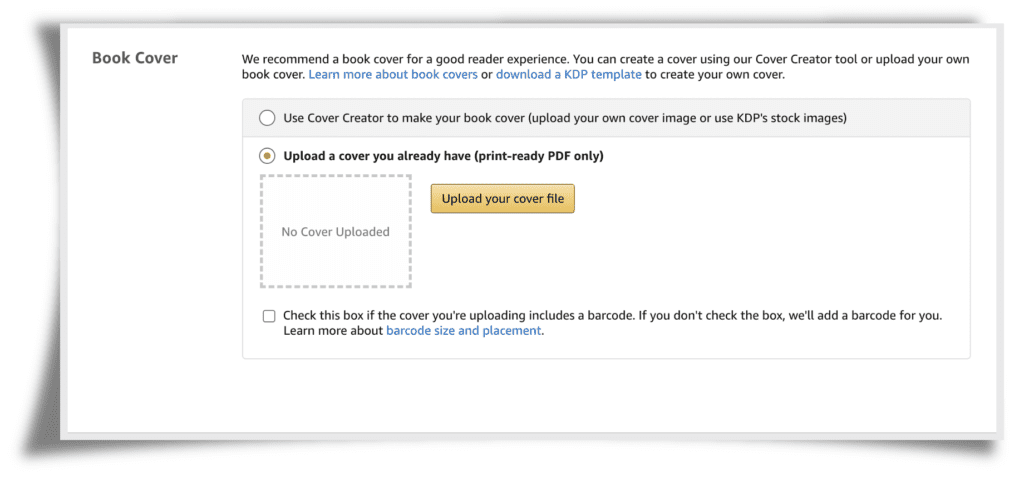
- The ‘Book Cover’ field gives you two options – to design a book cover using the inbuilt Cover Creator, or to upload your own cover. This is not only the front cover, but also includes the spine and back cover in the same file.
I had already designed my front cover in Canva, but not the spine or back cover yet, so at first decided to give the Cover Creator a go. I found it rather clunky and not user-friendly, so ended up using Canva to complete my cover, then uploaded this to Amazon KDP.
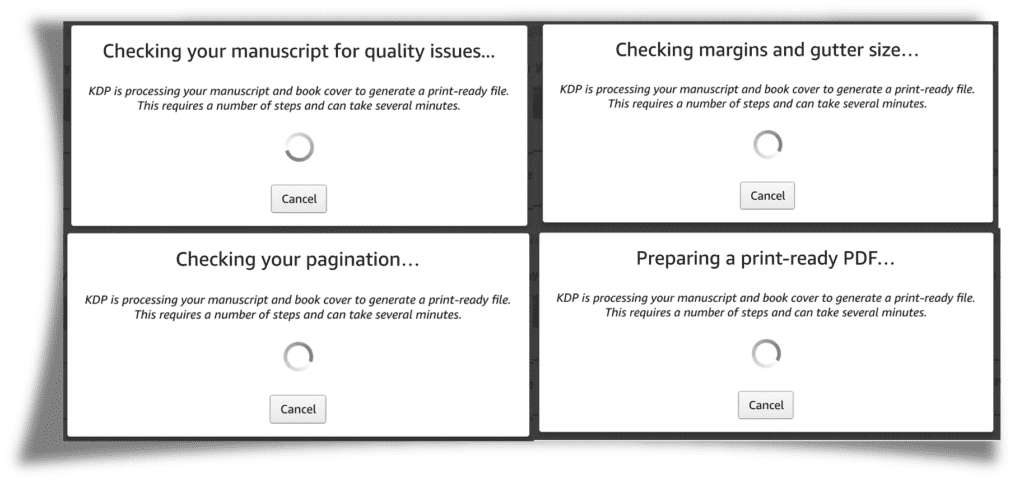
- Once your cover image has uploaded, you can click on the Launch Previewer button. Do this rather than selecting Save and Continue, as you’ll need to check that everything is ok with your book before the next step.
It takes a short while to generate the preview. It’s not usually enough time to make a cup of tea but enough to check your Facebook or Twitter feed. This is the system checking every aspect of your manuscript. It doesn’t just hang, though; it usefully tells you the various stages it is going through. When it says ‘Saving’, you know it’s almost done.
- Once the preview loads, the first thing you see is your cover (opened out). Check that it extends slightly beyond the white dotted line (which is where the cover will be physically cut), and that no text goes over the red dotted line. The spine fold will be on the white dotted lines. If there are any issues with the cover size, you’ll see them flagged up. These will usually be related to the image size you have uploaded not matching the trim size you chose in step 7. If you need to upload a revised cover, click on Exit Print Previewer.
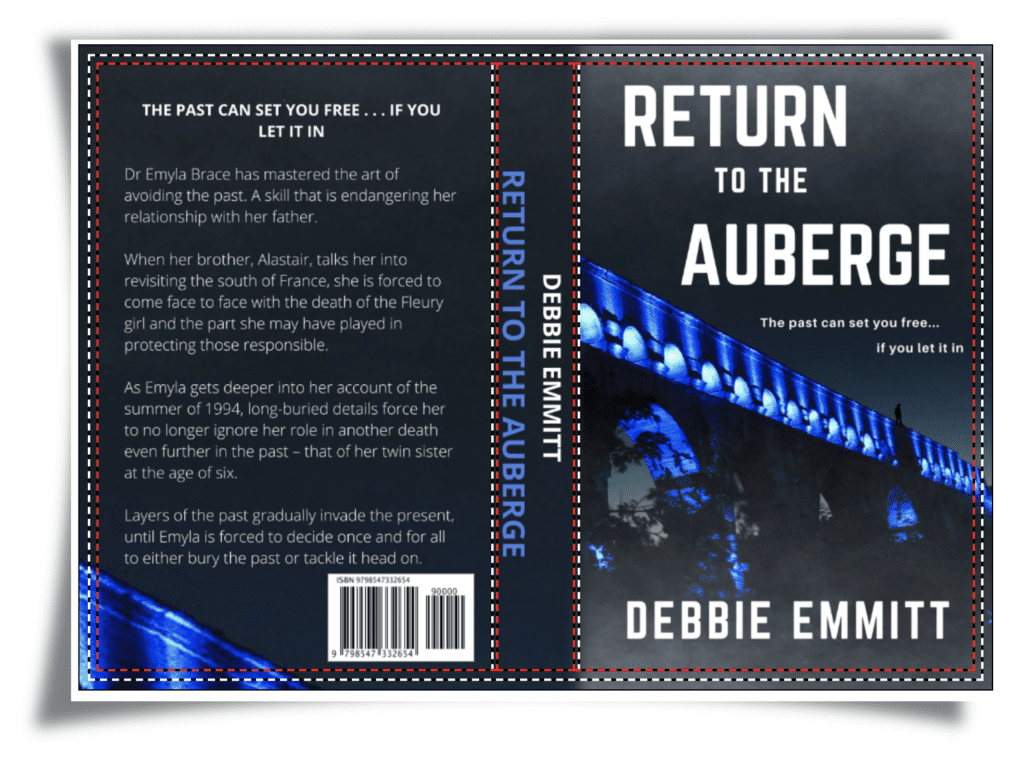
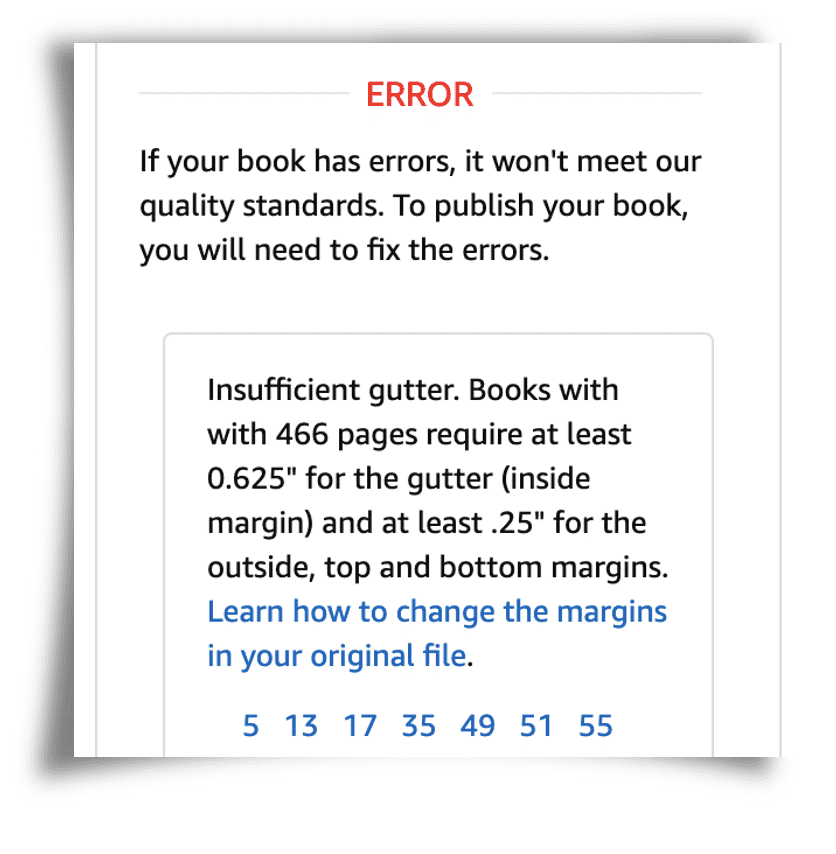
- You will also be told if there are certain errors with the interior of your book, for example, the gutter. This is the extra space allowed at the inside edge where the book will be bound.
I had this error, but easily fixed it by slightly increasing the margin size on the original file. KDP tells you which pages have issues. Clicking on the page numbers takes you directly to the error in question. You cannot proceed until you’ve fixed these issues.
- If you need to re-upload your PDF interior, click on Exit Print Previewer.
- Once there are no errors remaining (or if you had none the first time – clever you!), download a proof just to double check everything looks fine and dandy.
- Once you’re happy with how everything looks, click on Approve.
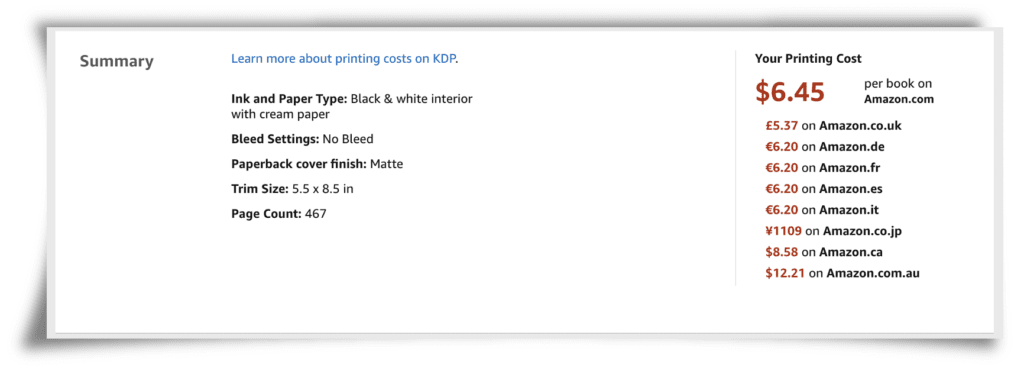
- Rather confusingly, this takes you back to the top of the Paperback Content tab. Scroll to the bottom to the Summary section which shows printing costs in different currencies. Click on Save and Continue.
- If you’re just ordering Amazon KDP printed proofs, rather than publishing your book, ignore everything on this page except for the section to request printed proofs. You’ll find it just below the Terms and Conditions section.

- Select how many proof copies you’d like (maximum of five per order). Then select the marketplace most closely associated with your location, and click on Submit Proof Request.
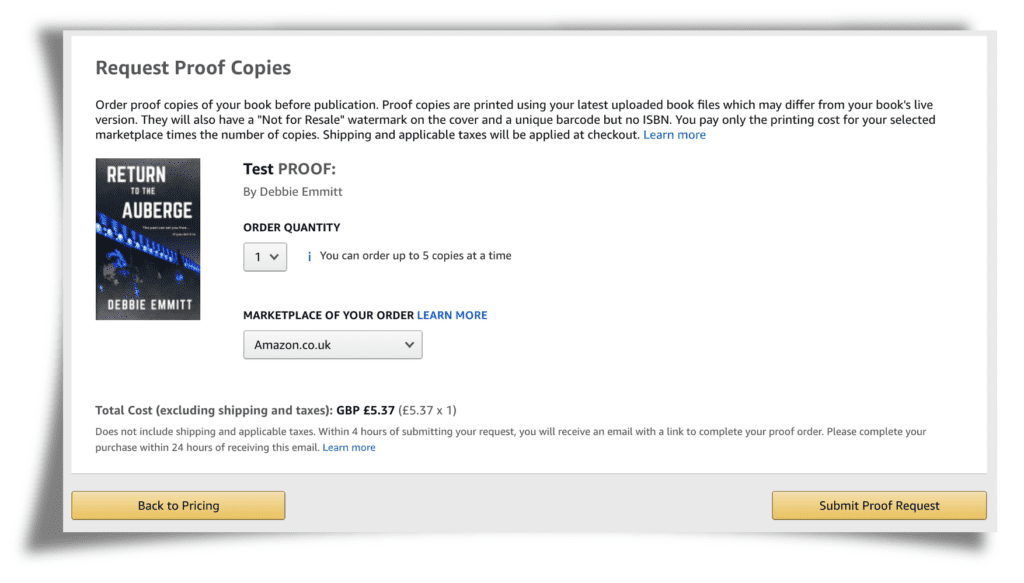
- The confirmation text will tell you to expect an email within four hours. This email will ask you to confirm and pay for your proof copies. In my experience, the email arrived in under an hour.
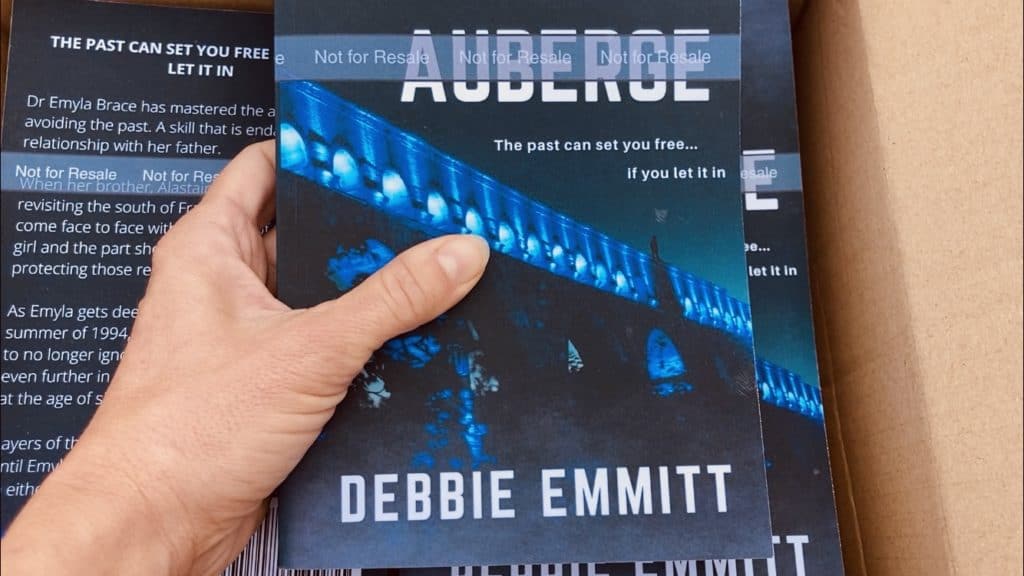
The result of my Amazon KDP printed proofs
I was a little nervous about how my proof copies would look in the flesh (or the paper…) I’d read mixed reviews about the quality of the cover, the paper and the print, so was managing my expectations.
However, not only did the books arrive a day early, but the quality is excellent. The cover is of comparable thickness to traditionally published paperbacks, as is the paper inside. The print is clear and the pages are laid out (margins, gutter, spacing) exactly as in the PDF I uploaded.
I couldn’t be happier. There are a few minor things that I would change if I ordered a second batch. However, these are all due to my oversight, rather than Amazon (e.g. size of font on back, text not justified). I have a product that I’m proud to send to my beta readers, so one happy writer here!
See the final result for yourself in the video.
Over to you
Do you have experience (good or bad) with ordering printed copies from either Amazon KDP or other online printers? Let me know in the comments!


Caroline Rebisz
Really useful blog. I have two books published via Amazon KDP and found the whole experience quite simple. I am not techie at all and the instructions are clear and guide you through the process. It’s great to get the proof copy in your hand!
Debbie Emmitt
Thanks, Caroline, glad you found the post useful. Congrats on having two published books! It is certainly a straightforward process, but there were certain aspects that I found myself googling, or making a small error the first time round. Hopefully this article will help to save others time and potential frustration!
Maureen
Debbie, this is so exciting! To see your book in hand—super job! I do appreciate this post as I’m pretty sure I’m going to self publish my chapter book. So good to have this information available bc I never would’ve thought about using KDP for proof copies. (Still learning a lot…) Do you know if Amazon still uses Ingram Spark to print? (Is there a way to know??) I’m wondering bc you mentioned the paper quality up above. That’s what I’ve been investigating: using the P.O.D. or a book publisher with traditional print presses. Anyway, thanks for this post. Congratulations! So exciting.
Debbie Emmitt
Hi Maureen. Thanks! I didn’t know anything about book printing until recently, so I wrote this post in the hope it would help others who are in the same situation.
Re. the paper quality, I’m really happy with my copies. However, it looks as though the printing facility location depends on where you live in the world (which I guess makes sense!). This would explain the mixed reviews I’ve seen, as I’d imagine the quality of the paper and the printing would vary from place to place. I don’t think they use Ingram Spark, from what I can glean online. Here’s a recentish thread about this topic: https://www.kdpcommunity.com/s/question/0D5f400001VYTywCAH/where-are-kdp-books-printed?language=en_US
Gina Murray
How long did it take you to get your proof copy once you ordered it?
Debbie Emmitt
The proofs came really quickly. I ordered them on 30 July and they arrived on 3 August, a day earlier than the scheduled delivery date. I couldn’t believe it!
Lyle
Really good blog. Thanks! I am going through KDP a second time for a proof. It is simple, fast, inexpensive, and useful. A proof is not required, but it is so helpful to catch errors and improve your book. My only question is when I get a proof with the dotted lines showing on the cover, does that mean the cover PDF needs to be fixed, or will it go away in the final publication?
Debbie Emmitt
Hi Lyle, glad you found the post useful! Re. the dotted lines, in Step 12 I explain what the red and white dotted lines mean. They don’t show in the final printed cover, they are just there when laying it out to guide you in aligning the front, back and spine. Hope this helps!
Kristen
Debbie – when I order the proof and input the basic information in the fields – when I am ready to go live – can I change it to my own ISBN and alter any of the discretionary fields ?
Debbie Emmitt
Hi Kristen, as long as you haven’t already published your book on Amazon, you can change the ISBN number. See this advice confirmed by Amazon itself: https://kdp.amazon.com/en_US/help/topic/G201834170#Change_ISBN I assume this goes for all the other fields too. Thanks for reaching out, good luck!