


If you’re looking for an easy availability calendar for your website, I’ve found one! Here’s how to add the WP Simple Booking Calendar to your webpages.
No matter what your business is, time is precious. I’m often contacted by authors or publishers who need an editor or proofreader sooner rather than later. I tend to be booked up for large projects (full-length books) at least one to two months in advance, sometimes longer. If there’s no wiggle room for an author or publisher’s deadline, it’s a waste of their time and mine to email me, only to be told that, unfortunately, I can’t fit their project into my schedule.
If only there was a way to show potential clients when I’m available.
It turns out, there is!
I started researching plugins for availability calendars, but most have too many bells and whistles for my purposes, e.g. allowing site visitors to actually book my time via the site. I didn’t want that, so I kept looking. Then I found this baby.
WP Simple Booking Calendar.
There’s a free and a paid version. For now, I’m using the free version and it seems to meet my needs. Visit my Contact page to see the calendar in action!
I want to add at this point that I’m not writing this post for commission of any kind. I just found this app and thought it was great, so wanted to share it with you.
I went looking for a simple availability calendar to add to my WordPress site. I found this baby. Share on XWithout further ado, here’s how to add an availability calendar to your WordPress site using this nifty little app.
Install and activate the calendar plugin
- In your WordPress admin dashboard, go to Plugins > Add New and search for ‘WP Simple Booking Calendar’.
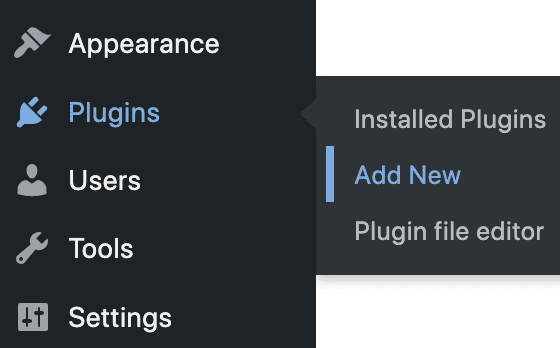
- Click on Install Now, then Activate.
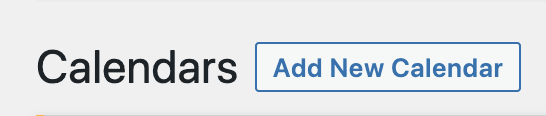
Set up your availability calendar
- Click on WP Simple Booking Calendar in your WordPress dashboard left-hand menu.
- Select Add New Calendar (the free version allows you to create just one calendar).
- Give your calendar a name (I called mine ‘My Availability’).
- Select Edit Calendar and you’ll see the calendar appear.
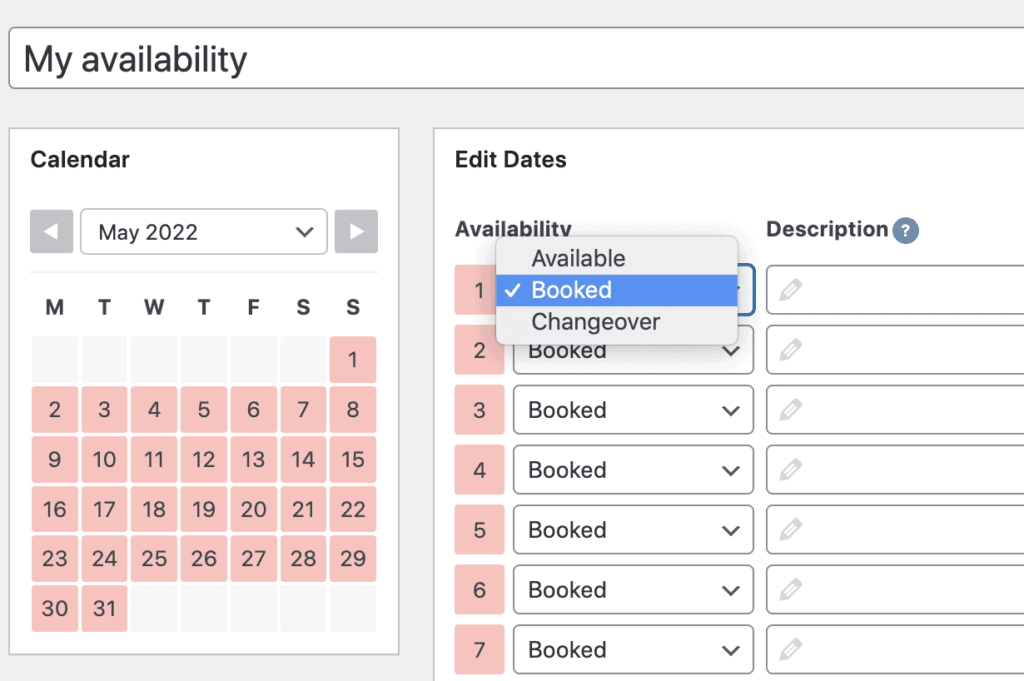
- Adjust your availability as you see fit. I only make use of green ‘Available’ and red ‘Booked’. The yellow ‘Changeover’ is for people who rent out accommodation. The paid version of the plugin allows you to edit these labels. As I’ve chosen not to display the legend/key on my webpage (instructions how to do this are below), this doesn’t matter to me.
- You can add details of your project bookings for your own private use in the Description field. This will not be displayed on your website. I just use clients’ initials, so that I’m not storing personal information here.
Add the calendar to your webpage/s
- Go to the webpage or widget area where you want to display the calendar.
- Add a new Custom HTML block (Hit Enter below existing content and where it says ‘Type / to choose new block’, type ‘/HTML’).

- Select Custom HTML.
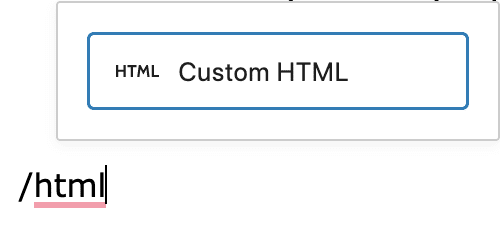
- In the box that appears, paste this code: wpsbc id=”1″ title=”yes” legend=”yes” legend_position=”top” dropdown=”yes” start=”1″ display=”2″ language=”auto” month=”0″ year=”0″ jump=”no” history=”1″ tooltip=”3″ theme=”classic” weeknumbers=”no” highlighttoday=”no”

- Save your page or widget and preview the page to see your calendar.
Tweak calendar settings
You can change the code that you pasted into the HTML block to make your calendar display more how you want it:
- To remove the legend/key (I did this because the ‘Changeover’ option would confuse my visitors and the free version of the app won’t let me remove it or edit the label), change legend=”yes” to legend=”no”.
- To remove the title, so that you can add your own heading and add text between your heading and the calendar, for example, change title=”yes” to title=”no”.
- If you’ve opted to display the legend, but want to move it, change legend-position=”top” to legend-position=”side” or legend-position=”bottom”.
- See the full list of tweaks you can make on the WP Simple Booking Calendar Documentation page (you’ll need to scroll down a bit to find it).
You can display your calendar in as many places on your website as you want, tweaking its appearance using the code as described above.
Hey presto, you’ve done it!
Next steps
For more details on how to use this plugin, take a look at the WP Simple Booking Calendar website.
Share a link to your calendar in the comments below! If I’ve confused you in any of the steps in this post, don’t be shy. Tell me where you got stuck and I’ll try to help!

Don’t stop now.
Find out everything there is to know about creating a killer author website.


Leave a Reply